My Notes Were Gathering Dust. So I Built a Home for Them.
Published on April 19, 2025
I have a confession: I’m a digital hoarder. For years, my thoughts, ideas, and code snippets have been piling up in the quiet, private corners of Obsidian and Apple Notes. They were safe, organized, and… completely invisible. One day, I looked at this personal treasure trove and a nagging question hit me: What’s the point of all this knowledge if it’s locked away where no one can see it?
I felt a sudden urge to share my ideas, not just as scattered thoughts, but in a permanent, open, and public way. This wasn’t just about starting a blog; it was about building a home for my work.
Technology Comparison
My first instinct was to find the easiest path. I started weighing my options, but every “easy” solution had a hidden cost that went against my goal of an open and controlled platform.
| Platform | Pros | Cons |
|---|---|---|
| GitHub Repo | No work, just push the md file to Github | No SEO |
| Notion | More customization | Vendor lock-in, Not open format |
| Static Website | More customization, More control, SEO, Open format | Maintenance |
The more I looked, the clearer the answer became: I had to build a proper static website. It was the only way to get the control, customization, SEO, and open format I truly wanted.
Defining the Blog Requirements
To avoid getting lost in the technical weeds, I first defined exactly what this blog needed to be. A clear set of requirements acts as a north star, guiding every technical decision that follows.
- Pages:
- A blog home page
- An individual blog page for each post
- An “About Me” page
- Core Features:
- A standard RSS feed for subscribers.
- A theme toggle (e.g., for light/dark mode).
- The ability to add new posts simply by adding
mdormdxfiles. - No code changes should be required to publish a new post.
- Posts must support images.
- The blog home page must sort posts by date.
Understanding Web Rendering Strategies
With my requirements defined, I had to face the “how.” As someone with a backend engineering background, the world of frontend frameworks felt like a maze. To navigate it, I first had to understand the core rendering philosophies.
- CSR (Client-Side Rendering): The browser renders the page. This is great for dynamic, app-like websites with a lot of user interaction.
- SSR (Server-Side Rendering): The server generates the HTML before sending it to the client. This is better for content-heavy sites that also need some dynamic capabilities.
- SSG (Static Site Generation): Pre-renders all pages into static HTML files during a “build” process. This is the fastest option for content that doesn’t change with every visitor, like a blog.
For my needs, a content-heavy site that needed to be fast and SEO-friendly, SSG or a hybrid approach seemed like the perfect fit.
Wireframe: Main Pages
Before writing a line of code, I sketched a simple wireframe. This helps translate requirements into a visual layout.
+---------------------------------------------+
|  Nav bar: home | Blog | about me |
+---------------------------------------------+
|                                             |
|          [Page Content Area]                |
|           (e.g., Blog Posts)                |
|                                             |
+---------------------------------------------+
Choosing a Framework
With a clear understanding of SSG, I could now properly evaluate my framework options. I’m familiar with the Node.js ecosystem, and two candidates stood out:
- Next.js: A powerful, full-fledged framework based on React that offers immense customization.
- Astro: A modern web framework that is heavily focused on SSG and creating content-rich, fast websites.
Technology Selection
Given my focus on a content-first blog and the power of SSG, the choice became simple.
- Framework: I opted for Astro. Its philosophy aligns perfectly with building a fast, static blog.
- Deployment: I considered several options, including GitHub Pages and Firebase, but ultimately chose Cloudflare. It was a great opportunity to learn their powerful suite of services.
npm create astro@latestHow to deploy the Astro site to CloudFlare
npx astro add cloudflareDeployment and Future Work
The final piece of the puzzle was automating the deployment. I set up a seamless flow using GitHub Actions.

[This flow illustrates the deployment pipeline from a code push to the live site ]
name: Deploy to Cloudflare Workers

on:
  push:
    branches:
      - main
  schedule:
    - cron: '0 20 * * *'
  repository_dispatch:
    types: [deploy]
  workflow_dispatch:

jobs:
  build-and-deploy:
    runs-on: ubuntu-latest
    name: Build and Deploy
    steps:
      - name: Checkout
        uses: actions/checkout@v4

      - name: Setup Node.js
        uses: actions/setup-node@v4
        with:
          node-version: '21'

      - name: Install dependencies
        run: npm install

      - name: Build
        run: npm run build

      - name: Deploy to Cloudflare Workers
        uses: cloudflare/wrangler-action@v3
        with:
          apiToken: ${{ secrets.CLOUDFLARE_API_TOKEN }}
          accountId: ${{ secrets.CLOUDFLARE_ACCOUNT_ID }}
          command: deploy
Building a Public Bookmarking Feature
With the blog’s foundation in place, I thought: “How can I make this more useful?” I decided to add a public bookmarking feature, a curated list of resources I find valuable.
This “simple” feature had its own set of requirements:
- It should be incredibly easy to add new links from my phone or computer.
- Links needed to have categories and tags.
- New links should appear on the site automatically.
Building a whole separate app for this was out of the question. The solution? A Telegram bot. I could simply send a link to the bot, which would then store it in a Cloudflare D1 database.
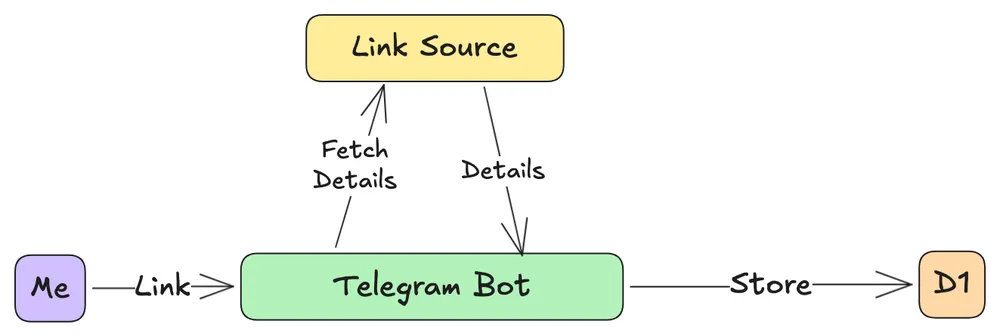
This created one final, crucial decision: how to display the bookmarks? Should the site fetch them from the database on every visit (SSR), or only when the site is rebuilt (SSG)?
SSR
const { results } = await Astro.locals.runtime.env.DB.prepare(
  'SELECT * FROM later_items ORDER BY date DESC'
).all();
SSG
const staticData = await import('../data/later-items.json');I chose SSG. While it means the bookmark list isn’t updated in real-time, it prevents a database call on every page load, keeping the site incredibly fast and efficient. Most importantly, it protects the site from the army of bots that scrape websites gazillion times.
- name: Fetch data from D1
. run: node scripts/fetch-data.js
. env:
	CLOUDFLARE_API_TOKEN: ${{ secrets.CLOUDFLARE_D1_API_TOKEN }}
	CLOUDFLARE_ACCOUNT_ID: ${{ secrets.CLOUDFLARE_ACCOUNT_ID }}
	D1_DATABASE_ID: ${{ secrets.D1_DATABASE_ID }}
	NODE_ENV: production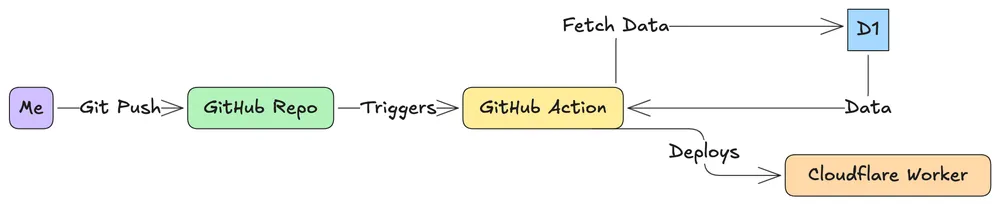
This project isn’t “done” 🤞 it’s a living thing. My next steps are to tackle pagination for the growing bookmark list and to solve for the increasing page size.
But for now, my notes have a home. If you’re sitting on a mountain of ideas, I challenge you to build a home for them, too. The world needs to see what you’re working on.